You can compose/edit an email template with any text or formatting using the built in email Composer. In addition to having standardized email templates, you can also include replacement codes that will be looked up based on various account data.
To compose/create an email template:
Login to your Admin site.
On the upper right-hand side of the top navigation toolbar click Campaigns
Click on Templates under Email Campaigns

Click on Add button upper right corner

Enter the Internal Name and Subject for the Email then click Add

Fill in the Basic info below

Subject - the actual subject that will appear when the email is sent.
Internal Name - the internal reference name of the email, this is only visible to you as the administrator.
Sender Email Address - select the sending email address from the pick-list.
Language - select the appropriate language to us from the drop-down.
Email Footer - select the desired language of the footer to be included in the email.
Approval Options - Approval options can be set on a template and will apply to any campaign created using the template. The options are:

Approval Required - The campaign will be built but not sent until a user approves the campaign. This setting is always recommended. It provides an opportunity to preview your emails before they are sent. It also give you a second chance to verify that the correct campaign is being sent to the correct accounts.
Pre-Approved - The campaign will be built and sent immediately.
No approval is required. This setting is not recommended unless there is another approval process in your work flow.
Email Type- please see below

Campaign - this is the default option. It should be used for most templates. This option will send an email going through the standard filtering processes. Consumers who unsubscribed will be suppressed from any list. Your whitelisting and blacklisting options will be used. This is the recommended setting for any emails intended to go to a mailing list.
Ad hoc - this options indicates that the template is not going to be used for a mailing list. It is a one off or Ad hoc email that is intended for use one at a time on a case by case basis. An example may be a confirmation email set to a debtor after having a call with them. Or a settlement confirmation on a single account. Ad hoc emails will be allowed to be sent regardless of whitelisting or blacklisting settings. Whitelisting and blacklisting apply only to mass emails or "Campaigns".
If an Attachment is to be included:
Click Choose Files.
Navigate to the file to be attached using your Windows explorer.
Choose from one of the Attachment Options: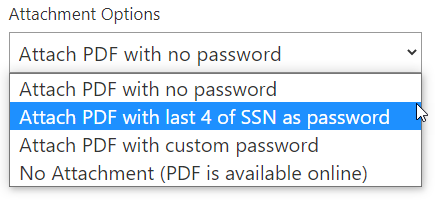
To set a maximum number of pages to be generated, enter the total pages in the Max Page Count field. This allows a safety net for dynamically created document to not exceed a maximum number of pages. If the document exceeds the max pages specified, it will be rejected.
In the Email Body section, simply enter the verbiage of the email, or add in Replacement codes that can be inserted and auto-filled based on built-in or custom tracking fields.
Add Images:
Click on image icon on the email menu.
Click on the Image List
Select from the list of images that have been uploaded to the system

Click Save when done
Customize with Replacement FieldsInsert a Replacement Field to include a built-in or custom field that will be inserted into the email or letter template and replaced with consumer specific data.

- Upon completion of changes, click the Save to just save changes. Or click the Save and Close icon located at the bottom on the window. and the updates will be saved and the window will be closed.
- To edit an email, select the email from the list and click on the link of the Internal Name of the template, as shown below.

Campaign Quick Tips:
Use the Search field above the Replacement Fields to quickly locate a replacement field that is needed in an email or letter template. Once inserted the system will automatically review the list of Replacement Fields and update the replacement field code with the correct consumer data before the campaign is sent.
Need to include a future date in communications? Use one of the DatePlusXX fields that will automatically calculate the number of days forward from today's date. Example [DatePlus45] will insert the the date 45 days from todays date. Eliminating the manual calculation and updating of email or letter templates.
Was this article helpful?
That’s Great!
Thank you for your feedback
Sorry! We couldn't be helpful
Thank you for your feedback
Feedback sent
We appreciate your effort and will try to fix the article